Bake like a pro with our 4 Ingredient Artisan Bread recipe! Only 4 simple ingredients for a flawless, delectable loaf. It’s so easy, it’s practically magic – a sure family hit!

Making bread at home can seem like daunting task. That’s why I’m sharing this super easy and effortless no-knead artisan bread. Once you make this you will want to make it over and over again. It is hard and crispy on the outside and then warm and fluffy on the inside making it the perfect bread for any occasion!
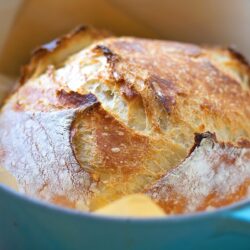
While it is foolproof, it is sure to make you look like a pro! It just looks so pretty, doesn’t it? Try pairing this crusty loaf of deliciousness with Homemade Tomato Soup, Instant Pot Spaghetti, or Perfect Pot Roast.
Table of Contents
Reasons Why I Love This Bread
- No kneading required, this easy Artisan bread recipe is easy and effortless.
- This Artisan loaf only needs four basic ingredients.
- This 4 ingredient bread has a long shelf life and stays fresh longer than typical homemade bread.
Recipe Ingredients

- All-Purpose Flour: Flour provides structure. Its mild, slightly nutty taste supports other flavors and creates a soft, chewy texture.
- Kosher Sea Salt: Enhances flavor significantly and the bread’s taste with its mineral-rich, clean profile.
See the recipe card for full information on ingredients and quantities.
Variations
- Use a Flour Alternative: Mix half all-purpose flour and half whole wheat flour. This maintains moisture while adding nutritional benefits, without risking the bread becoming too dry, as artisan bread typically has a very moist crumb. For a chewier texture and a stronger structure, consider using bread flour as part of your flour mixture.
- Gluten-Free Flour Caution: Avoid using gluten-free flour for this recipe, as it doesn’t provide the necessary rise, essential for artisan bread’s texture and structure.
- Add Greek Yogurt: Incorporate about ¼ cup of plain Greek yogurt to create a “cheater’s sourdough.” This adds a tangy, sourdough-like flavor without the lengthy process of making true sourdough bread.
How to Make No Knead Artisan Bread
Step 1: Whisk the flour, salt, and yeast in a medium bowl. While stirring with a wooden spoon, gradually add the water, stirring until incorporated. Gently mix the dough and form it into a rough ball.
Step 2: Transfer to a large clean (ungreased) bowl. Cover with plastic wrap and let the dough rise in a draft-free area at room temperature until the surface of the dough is covered with tiny bubbles and the dough has more than doubled in size. This usually takes about 18 hours, however, it still turns out great with just 12 hours of rise time.

Step 3: When the dough is ready, place a Dutch oven inside the oven and turn it on to 450 degrees Fahrenheit (232 degrees Celsius). Allow it to heat in the oven for 30 minutes.
Step 4: Meanwhile, transfer the dough to a well-floured surface. Take the corners and fold under, creating a ball. Place on a large square of parchment paper (big enough to cover the bottom of your Dutch oven). Dust the dough with flour, cover it with plastic wrap, and allow it to rest for 15 minutes. Using a sharp knife, at a 90-degree angle, score an X on the top of the loaf. Note: Each score mark should be about 2 ½ inches long and about 1/4″ deep. Using a mister, spray bottle, clean toothbrush, or pastry brush, lightly mist (or brush) the top of the bread with water.

Step 5: Carefully remove the Dutch oven from the oven. Place the shaped dough into it, cover, and return to the oven to bake for 30 minutes. Remove the lid and bake for an additional 8-15 minutes, or until the top is nice and dark (but not burnt). Remove from the oven and transfer the loaf of bread to a cooling rack. Allow it to cool for at least 30 minutes before slicing.

Expert Tips
Due to the high hydration of no-knead artisan bread dough, it can be sticky. Dust your hands and work surface with flour while shaping to prevent sticking. Shaping directly on a piece of parchment paper simplifies the process and eases transfer to the baking dish. Lift the parchment paper with the dough and place it in the baking vessel for a mess-free and seamless transfer, maintaining the dough’s shape.
Dutch Oven Notes:
I noticed that the outside of my Dutch oven got pretty speckled after baking this bread (it had a few stains from other recipes as well), and it didn’t look very pretty anymore.
How to Clean: The cheapest and most effective cleaning solution I’ve found is a nylon pot scrubber and a paste of hydrogen peroxide and baking soda. Generously apply the paste to troubled areas and scrub away. You’ll need to put a little elbow grease into it, especially where grease has been baked on, but it should all come off!
Frequently Asked Questions
This crusty bread recipe pairs wonderfully as a side with pasta dishes. Enjoy it alongside recipes like Kale, Spinach, and Basil Pesto Baked Pasta, Best Ever Baked Ziti, Quick and Easy Garlic Butter Noodles, Instant Pot Spaghetti, or Chicken Tetrazzini for a delightful meal.
Yes, you can use rapid-rise yeast (instant yeast) in place of active dry yeast for no-knead artisan bread. It may slightly speed up the fermentation process, so keep an eye on the dough’s progress.

Storage Info
No-knead artisan bread can be kept at room temperature for up to 3 days, ideally wrapped in a clean cloth or stored in a paper bag to preserve its crusty exterior. If you prefer to store your bread on the counter, ensure it’s in a cool, dry spot away from direct sunlight.
To FREEZE, place the bread in a sealed plastic bag and store it for up to 3 months. When you’re ready to enjoy it, THAW the bread at room temperature. To revive the crust, lightly sprinkle water over the bread and reheat it in a preheated oven at 350°F (about 177°C) for approximately 10 minutes, or until the crust becomes crispy once more.
More Bread Recipes to Try
4 Ingredient Artisan Bread Recipe
Ingredients
- 3 1/4 cup all purpose flour
- 1 ½ – 2 tsp salt - kosher sea salt
- 1/2 tsp active dry yeast
- 1 1/2 cup warm water
Instructions
- Whisk the flour, salt, and yeast in a medium bowl. While stirring with a wooden spoon, gradually add the water, stirring until incorporated. Gently mix the dough and form it into a rough ball.
- Transfer to a large clean (ungreased) bowl. Cover with plastic wrap and let the dough rise in a draft-free area at room temperature until the surface of the dough is covered with tiny bubbles and the dough has more than doubled in size. This usually takes about 18 hours, however, it still turns out great with just 12 hours of rise time.
- When the dough is ready, place a Dutch oven into the oven and turn it on to 450 degrees Fahrenheit (232 degrees Celsius). Allow it to heat in the oven for 30 minutes.
- Meanwhile, transfer the dough to a well-floured surface. Take the corners and fold under, creating a ball. Place on a large square of parchment paper (big enough to cover the bottom of your Dutch oven). Dust the dough with flour, cover it with plastic wrap, and allow it to rest for 15 minutes. Using a sharp knife, at a 90-degree angle, score an X on the top of the loaf. Each score mark should be about 2 ½ inches long and about 1/4" deep. Using a mister, spray bottle, clean toothbrush, or pastry brush, lightly mist (or brush) the top of the bread with water.
- Carefully remove the Dutch oven from the oven. Place the shaped dough into it, cover, and return to the oven to bake for 30 minutes. Remove the lid and bake for an additional 8-15 minutes, or until the top is nice and dark or golden brown (but not burnt). Remove from the oven and transfer the loaf of bread to a cooling rack. Allow it to cool for at least 30 minutes before slicing.
VIDEO
NOTES
- Please use coarse Kosher sea salt, NOT table salt.
- For a really crunchy loaf, allow the loaf to “cool” for 30 minutes on the rack of a partially open (and OFF) oven, just like you would a cheesecake. Remove and slice!


Delish and easy ! Made it yesterday, caprese salad and a glass of wine, sooooo good !
Sounds like you had an amazing dinner Cindy!
Honestly, doesn’t really seem that simple. Too many instructions.
The instructions may look long, but it’s a rather quick process. I try to be as detailed as possible so that your results are the same as mine.
It is so simple!!! Trust us!!!
Many of the instructions are one step but have been broken into tiny ones for easy understanding. I.e., an additional step was really not required to tell you how to form a ball, but it was. It is very simple, and very forgiving. I have been making this type of bread for a few years and the more you do it, the faster you get. I place mine on the pellet stove so it doesn’t take as long to rise. If you want a flatter shaped bread, use a large dutch oven. If you want a higher more round shape, use a smaller one. I have 2 cast iron ones that are perfect and used only for this purpose.
Thank you for the suggestion of different pot size. The recipe did not indicate size and results of using bigger or smaller. I used what I had :6 qt. Dutch oven . I think the smaller one would help give the bread a higher rise.
It’s very simple, mix ingredients and set aside or 12-18 hours, maybe even up to 24 hours, if it’s in a cool place like in the winter. Follow Baking instructions and it turns out perfect…YUMMM!!!
Do you grease or oil the Dutch oven?
Nope 🙂
Hello!
I just made this and it was on the right track, but not quite there yet. Crust was amazing, but the middle was fairly dense and there was almost a bitter taste to it. I’m not sure if this was due to the seasoning of my Dutch oven since it’s pure cast iron. I do live at elevation in Denver so I’m not sure if that could play a part! Any help would be great!
I wish I knew for sure. It could be part of it. Following the recipe, I haven’t had those issues. I’m sorry!
My dough was hard to keep the nice shape of a ball as in this picture and was still kind of wet unless i put alot of flour over and under which seemed to do the trick but while resting for 15 mins, it spread out. Also the x marks were hard to maintain, and by the time i put the dough into the dutch oven, it was fairly large and was already the size of the bottom of the dutch oven. Baking now. Any tips you can lend?
Did you fold the corners in & under to create the ball? It doesn’t have to be perfect 😉 It does spread a little during the 15 minutes. There is just the one “x” on the top & that’s ok, if it’s just about the size of the dutch oven bottom. The bread is supposed to rise up & shouldn’t spread out too much more. It’s so hard to know how to help, sometimes, since I was not there, but just keep practicing 🙂 Hopefully, it tasted ok!
Put the dough with parchment paper for the second rise in a bowl. This will keep from spreading. When ready for Dutch oven pot, merely lift it out of the bowl holding parchment paper and lift out and insert into the pit. This should keep it round. Works for me
I like to mist the top of this with a bit of olive oil from my Misto sprayer. It gives it a nice, crispy top! Also, you can use an old-school Corning Ware casserole dish to bake it in. It gives the bread a high, square, “cushion” shape. I love how this bread is so versatile! We’ve even had it for breakfast with butter and jam, or with melted cheese on top as a snack. Yumminess 😋!
Great idea!! I will have to try! Thank you for letting us know what you do! Glad you like this bread!
The elevation is definitely an issue. Do a bit of research on the adjustments needed on yeast and such.
Yes that is true. Altitude can definitely affect rising times.
I live in high altitude and haven’t had issues. 8000 ft. I used to live 14,000 ft in Cerro de Pasco Peru and my mom baked all the time and baked cakes and bread without problems. Maybe the flour and yeast was different in the old days. It was 1960. So not sure. Made the bread. Very good .
I had a question. I just want to get this correct. After covering the dough with plastic wrap. I then proceeded to make the cuts on the dough and lastly spray it. I just want to make sure I am waiting 15 minutes before making the cuts?
Yep, you got it 🙂 Good luck!
so good
hey girl yummy for my tummy! I love bread!