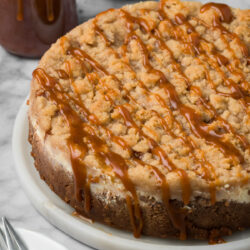
Satisfy your sweet tooth with our Perfect New York Cheesecake, so rich and delicious it feels like it’s fresh from the bakery.

You will fall in love with this decadent New York Cheesecake recipe. Compared to traditional cheesecakes, a New York Cheesecake consists of a higher amount of cream cheese making it both dense and creamy. Baked low and slow, it has a firm structure that slices cleanly while remaining luxuriously soft with every bite.
For other cheesecake recipes you have to check out my Banana Pudding Cheesecake, Perfect Chocolate Cheesecake, and Key Lime Cheesecake.
Table of Contents
Why We Love This Cheesecake
- Perfect New York Cheesecake recipe uses simple, easy-to-find ingredients.
- It’s a beloved choice for holiday desserts.
- This cheesecake has a long shelf life. It stays fresh for several days when refrigerated, making it a great make-ahead dessert.
Recipe Ingredients

- Cream Cheese: Provides the rich, creamy texture and tangy flavor essential for a classic New York cheesecake.
- Heavy Whipping Cream: Adds richness and a smooth, velvety texture to the filling.
- Vanilla Bean Paste: Infuses the topping with a more intense, aromatic vanilla flavor and attractive specks of vanilla.
See the recipe card for full information on ingredients and quantities.
Variations
- Assorted Crust Options: Substitute the graham cracker crust with a variety of alternatives for a unique twist. Use crushed Oreos, vanilla wafers, ice cream cones, granola cereal, cornflake cereal, crushed pretzels, or coconut macaroons. Combine with melted butter to ensure they stick together effectively.
- Topping Options: Drizzle caramel, chocolate, or strawberry syrup with fresh strawberries. Add a dollop of whipped cream, mascarpone, chocolate shavings, or sprinkle crushed candies or cookies for extra texture and flavor. Fresh blueberries and raspberries also add a burst of color and tangy sweetness.
How to Make New York Cheesecake
Step 1: Cover the bottom and sides of a 9-inch springform pan with extra-large aluminum foil so that no water can leak in (it’s worth a trip to the store to buy the 18″ wide foil). Wrap it with two layers for extra security. Crimp the top of the foil around the top edge of the springform pan. You can also place the springform pan in a slightly larger cake pan (10″) that has 2″ sides. (I ran out of big foil but had a nice cake pan that it just barely fit into. I didn’t have to worry at all about the foil keeping water out).
Step 2: Preheat oven to 350°F (175°C), placing the top rack in the lower third of the oven. In a large mixing bowl, mix together the finely ground graham cracker crumbs with the sugar and salt. Pour the melted butter over top and mix until the crumbs become coated.
Step 3: Pour into the prepared springform pan and gently smooth out (I like to use a metal measuring cup for this). Carefully work the crumbs up the sides so that they are 1 1/2″ tall and approximately 1/4″ thick. You should have a nice layer on the bottom, and the sides should go about halfway up your pan. Place into the oven and bake for 8-10 minutes or until lightly golden brown. Turn oven down to 325°F (160°C).
Step 4: Beat the cream cheese, salt, and vanilla in the bowl of a stand mixer for approximately 4 minutes or until smooth and creamy. With mixing speed on low, gradually add the sugar, then turn it back up to high and beat for an additional minute. With mixing speed on low, add the eggs one at a time, mixing until incorporated. Add the sour cream, then the heavy cream, and beat on high for 1 minute.
Step 5: Place the prepared springform pan into a large high-sided roasting pan. Pour the cream cheese filling into the springform pan, smoothing out the top with a spatula. Pour boiling water around the springform pan, taking care not to get any on the filling. You’ll want the water to go halfway up the side of the pan (this was just to the lip of my 2″ tall cake pan). Place in the oven and bake at 325°F (160°C) for 1 hour and 45 minutes. If you like extra firm cheesecake, continue baking for an additional 15 minutes for a total of 2 hours.
Step 6: After the cheesecake has been baked, turn off the oven, slightly crack the door open, and allow it to cool for 1 hour. This is the key to getting a perfect top without it falling or cracks forming.
Step 7: Remove the cheesecake from the bath and dry the bottom of the pan. Place in the refrigerator on a wire cooling rack to chill for at least 4 hours before serving; I prefer 6+ hours. Wrap the top of the cheesecake with foil after 30 minutes in the refrigerator (giving the cheesecake 30 minutes will help prevent condensation from forming on the underside of the foil).
Step 8: Prepare the topping by combining all of the ingredients in a mixing bowl and stirring together until smooth. Using a spatula, spread over the top of the cooled cheesecake (you can also do this at about 3 hours into the chill time so that it can set during that remaining hour). During the chilling process, the cheesecake should come away from the edges of the pan, making it easy and mess-free to remove before serving.

Expert Tips
- Use Water Bath: Use a water bath to bake your classic New York style cheesecake. This method ensures slow, even cooking, giving the cheesecake a smooth, custard-like texture. For safety, use a kettle to pour the hot water, preventing spills and burns.
- Scrape for Smoothness: When mixing the cheesecake batter, periodically scrape the sides and bottom of the bowl with a rubber spatula. This ensures all ingredients are fully incorporated, resulting in a smooth, consistent batter.
FAQs
Yes, this recipe uses a stand mixer. However, you can also use a hand mixer or electric mixer. Beat the cream cheese at medium speed until it is soft and creamy when using a hand mixer. When using an electric mixer, always run it on the lowest speed possible to avoid whipping air into the batter, as air bubbles can cause cracks during baking.
For the best experience, serve the cheesecake chilled, straight from the refrigerator. Use a hot knife to slice cleanly and add your favorite toppings like fresh berries, whipped cream, or a drizzle of caramel or chocolate.

Storage Info
To STORE your Perfect New York Cheesecake, keep it covered in the refrigerator for up to 1 week. You can also FREEZE it for up to 3 months by wrapping it tightly in plastic wrap and aluminum foil, then placing it in your freezer.
To REHEAT, thaw the cheesecake in the refrigerator overnight. While cheesecake is best served chilled, if you prefer it warm, gently reheat slices in the microwave for 10-15 seconds.
More Delicious Cheesecakes To Try

Perfect New York Cheesecake Recipe
Ingredients
For the Crust
- 2 cup graham cracker crumbs - about 15 sheets
- 2 tbsp granulated sugar
- pinch salt
- 5 tablespoons butter - melted
For the Filling
- 4 (8 oz) blocks plain cream cheese - room temperature
- 1/4 tsp salt
- 1 tbsp vanilla extract
- 1 1/2 cup granulated sugar
- 4 large eggs - room temperature
- 2/3 cup sour cream - room temperature
- 2/3 cup heavy whipping cream - room temperature
For the Sour Cream Topping
- 1 1/2 cup sour cream
- 1/4 cup powdered sugar
- 1 teaspoon vanilla bean paste
Instructions
- Cover the bottom and sides of a 9-inch springform pan with extra-large aluminum foil so that no water can leak in (it's worth a trip to the store to buy the 18" wide foil). Wrap it with two layers for extra security. Crimp the top of the foil around the top edge of the springform pan. You can also place the springform pan in a slightly larger cake pan (10") that has 2" sides. (I ran out of big foil but had a nice cake pan that it just barely fit into. I didn't have to worry at all about the foil keeping water out).
- Preheat oven to 350°F (175°C), placing the top rack in the lower third of the oven. In a large mixing bowl, mix together the finely ground graham cracker crumbs with the sugar and salt. Pour the melted butter over top and mix until the crumbs become coated.
- Pour into the prepared springform pan and gently smooth out (I like to use a metal measuring cup for this). Carefully work the crumbs up the sides so that they are 1 1/2" tall and approximately 1/4" thick. You should have a nice layer on the bottom, and the sides should go about halfway up your pan. Place into the oven and bake for 8-10 minutes or until lightly golden brown. Turn oven down to 325°F (160°C).
- Beat the cream cheese, salt, and vanilla in the bowl of a stand mixer for approximately 4 minutes or until smooth and creamy. With mixing speed on low, gradually add the sugar, then turn it back up to high and beat for an additional minute. With mixing speed on low, add the eggs one at a time, mixing until incorporated. Add the sour cream, then the heavy cream, and beat on high for 1 minute.
- Place the prepared springform pan into a large high-sided roasting pan. Pour the cream cheese filling into the springform pan, smoothing out the top with a spatula. Pour boiling water around the springform pan, taking care not to get any on the filling. You'll want the water to go halfway up the side of the pan (this was just to the lip of my 2" tall cake pan). Place in the oven and bake at 325°F (160°C) for 1 hour and 45 minutes. If you like extra firm cheesecake, continue baking for an additional 15 minutes for a total of 2 hours.
- After the cheesecake has been baked, turn off the oven, slightly crack the door open, and allow it to cool for 1 hour. This is the key to getting a perfect top without it falling or cracks forming.
- Remove the cheesecake from the bath and dry the bottom of the pan. Place in the refrigerator on a wire cooling rack to chill for at least 4 hours before serving; I prefer 6+ hours. Wrap the top of the cheesecake with foil after 30 minutes in the refrigerator (giving the cheesecake 30 minutes will help prevent condensation from forming on the underside of the foil).
- Prepare the topping by combining all of the ingredients in a mixing bowl and stirring together until smooth. Using a spatula, spread over the top of the cooled cheesecake (you can also do this at about 3 hours into the chill time so that it can set during that remaining hour). During the chilling process, the cheesecake should come away from the edges of the pan, making it easy and mess-free to remove before serving.


I almost never comment on recipes, but I’ve been using this recipe for years and it is, hands down, the best cheesecake recipe out there. This recipe made me like cheesecake, and I still eat this cheesecake almost exclusively. In fact, I often end up making this after I eat other cheesecake because I’m always disappointed and find myself craving “good cheesecake.” My friends all say it’s the best they’ve ever had. I make it exactly as written. Thanks for the GREAT recipe!
Thank you so much for such an amazing receipt. This was my first experience and cheesecake came out with no cracks and with very nice top. Thank you!
My hubby LOVES cheesecake and I have a hate/love relationship with baking but this cheesecake came out AMAZING and it was my first time trying it.
It was an absolute hit 🙂
Thanks Ninfa, I love hearing that! So happy it was a hit!!
The recipe is very firm and creamy! I zested and squeezed two small key west limes in it for lime flavored and it was just right. Instead of fighting with tin foil and risking getting water in the cheesecake, you can achieve the same humidity level in the oven by placing the boiling water in a large loaf pan off to the side of the spring form pan. I have always done it this way and never get cracks. I always place a cookie sheet under the spring form pan as leak insurance though.
Great idea Robert!
Could i bake this recipe in mason jars? Having a baby shower and thought the individual 1/2 pint jars would look cute with a wooden spoon tied around the lids?
I don’t see why not, I’m just not sure how many jars you would need or the amount of time. Please let me know how it works out if you give it a try!