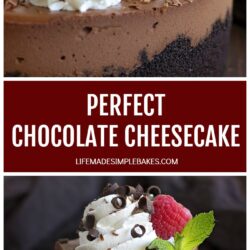
This Perfect Chocolate Cheesecake is dangerously delicious – every bite is a melt-in-your-mouth experience that chocolate lovers won’t forget.

This Perfect Chocolate Cheesecake is a transformation of my Perfect New York Cheesecake in the best way! It’s rich, smooth, and irresistibly decadent, truly a chocolate lovers dream dessert. A chocolate Oreo crust is the base for this velvety chocolate cheesecake that everyone will love!
We love cheesecake! For more cheesecake recipes you have to check out my Eggnog Cheesecake, Banana Pudding Cheesecake, and Pecan Pie Cheesecake.
Table of Contents
Why We Love This Cheesecake
- Bakes up with a flawless, crack-free top.
- Decadent enough to satisfy even the biggest chocolate cravings.
- Can be prepared in advance, making it convenient for holidays, birthdays, or other group gatherings.
Recipe Ingredients

Crushed Oreos – For the crust! A chocolate cheesecake needs a chocolate crust, and Oreos are perfect for it. Just make sure to remove the cream from the cookies before crushing them.
Cream Cheese – Use plain, brick-style cream cheese. This gives the cheesecake a dense, creamy texture. Avoid the spreadable tub kind – it has additives that can prevent your cheesecake from setting properly.
Bittersweet Chocolate – For a deep, intense flavor, use chocolate with 50-70% cacao. Cool it after melting to prevent curdling when mixed with other ingredients.
For a full list of ingredients and amounts, see the recipe card below.
Variations
Crust Alternative – A classic graham cracker base can provide a slightly lighter taste.
Chocolate Variation – To make it sweeter, choose semi-sweet chocolate. Additional options include milk chocolate, rich dark chocolate (80% cacao or more), white chocolate, chocolate chips, or specialty flavors like hazelnut or espresso.
How to Make Perfect Chocolate Cheesecake
Step 1: Cover the bottom and sides of a 9-inch by 3-inch springform pan with extra-large aluminum foil so that no water can leak in (it’s worth a trip to the store to buy the 18″ wide foil). Wrap it with two layers for extra security. Crimp the top of the foil around the top edge of the springform pan. You can also place the springform pan in a slightly larger cake pan (10″) that has 2″ sides (I ran out of big foil but had a cake pan that it just barely fit into. I didn’t have to worry at all about the foil keeping water out).
Step 2: Preheat oven to 350 degrees Fahrenheit (175 degrees Celsius), placing the top rack in the lower third of the oven. In a large mixing bowl, mix together the finely ground Oreo crumbs with the sugar and salt. Pour the melted butter over top and mix until the crumbs become coated.
Step 3: Pour into the prepared springform pan and gently smooth out (I like to use a metal measuring cup for this). Carefully work the crumbs up the sides so that they are 1½ inches tall and approximately ¼ inch thick. You should have a nice layer on the bottom, and the sides should go about halfway up your pan. Place into the oven and bake for 8 minutes. Remove and turn the oven down to 325 degrees Fahrenheit (160 degrees Celsius).
Step 4: Beat the cream cheese, sugar, sour cream, and heavy cream in the bowl of a stand mixer fitted with the paddle attachment for approximately 4 minutes or until smooth and creamy. With mixing speed on low, gradually add the melted chocolate, cocoa powder, and salt. Turn the mixing speed back up to high and beat for an additional minute. With mixing speed on low, add the eggs one at a time, mixing until incorporated. In a small bowl, dissolve the espresso powder in the vanilla extract. With the mixing speed on low, add the vanilla/espresso mixture, then beat it on high for 1 minute.
Step 5: Place the prepared springform pan into a large high-sided roasting pan to create a water bath. Pour the filling into the springform pan, smoothing out the top with a rubber spatula. Pour boiling water around the springform pan, taking care not to get any on the filling. You’ll want the water to go halfway up the side of the pan (this was just to the lip of my 2-inch tall cake pan). Place in the oven and bake at 325 degrees Fahrenheit (160 degrees Celsius) for 1 hour and 30 minutes. If you like extra firm cheesecake, continue baking for an additional 15 minutes for a total of 1 hour 45 minutes.
Step 6: After the cheesecake has been baked, turn off the oven, slightly crack the door open, and allow it to cool for 30 minutes. This is the key to getting a perfect top without it falling or cracks forming.
Step 7: Remove the cheesecake from the bath and dry the bottom of the pan. Place in the refrigerator on a wire cooling rack to chill for at least 4 hours before serving. Wrap the top of the cheesecake with foil after 30 minutes in the refrigerator (giving the cheesecake 30 minutes will help prevent condensation from forming on the underside of the foil).
Step 8: During the chilling process, the cheesecake should come away from the edges of the pan, making it easy and mess-free to remove before serving. Top with freshly whipped cream, chocolate shavings or curls, fresh raspberries, and mint, if desired.

FAQs
Yes, a water bath helps create a smooth texture and prevents cracks in Chocolate Cheesecake.
You can use a regular cake pan instead. Just line it with parchment paper to prevent the cheesecake from sticking to the bottom.
Storage Information
STORE cheesecake in the refrigerator, loosely covered with aluminum foil or plastic wrap, for up to a week. Avoid leaving it out for more than 2-4 hours.
To FREEZE, place parchment paper over each slice, wrap tightly in plastic wrap, then in foil, and store in a freezer-safe container or bag for up to 3 months. Thaw frozen cheesecake in the fridge for 7-8 hours or overnight before serving.


Perfect Chocolate Cheesecake Recipe
Ingredients
For the Crust
- 2 cup crushed Oreos - cream removed
- 2 tbsp granulated sugar
- pinch salt
- 5 1/2 tbsp unsalted butter - melted
For the Filling
- 2 lb plain cream cheese - ((4) 8 oz blocks), room temperature
- 1 1/2 cup granulated sugar
- 1/2 cup sour cream - room temperature
- 1/2 cup heavy whipping cream - room temperature
- 12 oz bittersweet chocolate - melted and cooled
- 1/4 cup unsweetened cocoa powder
- 1/4 tsp kosher sea salt
- 4 eggs - room temperature
- 1 tbsp vanilla extract
- 1/4 teaspoon espresso powder - optional
For the Toppings
- whipped cream
- chocolate shavings or curls
- fresh raspberries
- sprigs of mint
Instructions
- Cover the bottom and sides of a 9-inch by 3-inch springform pan with extra-large aluminum foil so that no water can leak in (it's worth a trip to the store to buy the 18" wide foil). Wrap it with two layers for extra security. Crimp the top of the foil around the top edge of the springform pan. You can also place the springform pan in a slightly larger cake pan (10") that has 2" sides (I ran out of big foil but had a cake pan that it just barely fit into. I didn't have to worry at all about the foil keeping water out).
- Preheat oven to 350 degrees Fahrenheit (175 degrees Celsius), placing the top rack in the lower third of the oven. In a large mixing bowl, mix together the finely ground Oreo crumbs with the sugar and salt. Pour the melted butter over top and mix until the crumbs become coated.
- Pour into the prepared springform pan and gently smooth out (I like to use a metal measuring cup for this). Carefully work the crumbs up the sides so that they are 1½ inches tall and approximately ¼ inch thick. You should have a nice layer on the bottom, and the sides should go about halfway up your pan. Place into the oven and bake for 8 minutes. Remove and turn the oven down to 325 degrees Fahrenheit (160 degrees Celsius).
- Beat the cream cheese, sugar, sour cream, and heavy cream in the bowl of a stand mixer fitted with the paddle attachment for approximately 4 minutes or until smooth and creamy. With mixing speed on low, gradually add the melted chocolate, cocoa powder, and salt. Turn the mixing speed back up to high and beat for an additional minute. With mixing speed on low, add the eggs one at a time, mixing until incorporated. In a small bowl, dissolve the espresso powder in the vanilla extract. With the mixing speed on low, add the vanilla/espresso mixture, then beat it on high for 1 minute.
- Place the prepared springform pan into a large high-sided roasting pan to create a water bath. Pour the filling into the springform pan, smoothing out the top with a rubber spatula. Pour boiling water around the springform pan, taking care not to get any on the filling. You'll want the water to go halfway up the side of the pan (this was just to the lip of my 2-inch tall cake pan). Place in the oven and bake at 325 degrees Fahrenheit (160 degrees Celsius) for 1 hour and 30 minutes. If you like extra firm cheesecake, continue baking for an additional 15 minutes for a total of 1 hour 45 minutes.
- After the cheesecake has been baked, turn off the oven, slightly crack the door open, and allow it to cool for 30 minutes. This is the key to getting a perfect top without it falling or cracks forming.
- Remove the cheesecake from the bath and dry the bottom of the pan. Place in the refrigerator on a wire cooling rack to chill for at least 4 hours before serving. Wrap the top of the cheesecake with foil after 30 minutes in the refrigerator (giving the cheesecake 30 minutes will help prevent condensation from forming on the underside of the foil).
- During the chilling process, the cheesecake should come away from the edges of the pan, making it easy and mess-free to remove before serving. Top with freshly whipped cream, chocolate shavings or curls, fresh raspberries, and mint, if desired.


this is time consuming but worth every step. So good!
I followed the instructions to the letter. I am a pretty experienced baker and I actually went out and purchased a 9″ spring form as my other was 12″ and I wanted to make sure the cheesecake was nice and deep. It looks good. It’s in baking now and I’m sure it will taste delicious. The reason for the 3 stars is I believe it doesn’t need 4 blocks of cream cheese or 4 eggs to fill the pan. I have enough mix left over (the filling was right to the top of my 9′ inch spring form pan) that looks like about a block and 1egg would make by itself. This is such a waste. Not sure what to do with all the left overfilling.
I went back and read through all the comments and it does seem like a few people had similar issues but most commented that it turned out perfectly. I’m not sure what is making the difference. Maybe the crust layer isn’t compacted down enough, taking up more space…? To be safe you can always use a 10″ pan or make little ramekin sized ones out of the extra.
Hi! I made this for my pregnant sister and she loved it so I was wanting to surprise her for her baby shower but wanted to make mini cheesecakes. Can you advise on how long to cook them for using a cupcake tin?
Hi Sydney,
Please note that I haven’t done this before with this recipe, but giving you instructions from my mini cheesecakes recipe. Set the oven to 325 F.
This recipe should make about 24 cupcake pan sized mini cheesecakes. The cooking time is much less.
Scoop 1 ½ tablespoons of the crust mixture into the bottom of each liner. Press to create a firm, even crust. Bake for 6-8 minutes, then remove and allow to cool.
Divide the batter between the 24 muffin liners. They will be full, just make sure they have at least ⅛ inch of liner showing. Tap the pan on the counter 3 times. Place into the oven and bake for 24-26 minutes. They will still look moist in the center but will set as they cool. Crack the door to the oven and allow the cheesecakes to rest for 10 minutes before transferring the pan to a wire rack to cool completely. Chill in the refrigerator for at least an hour before serving. Optionally, top with whip cream and fruit if desired. Please let us know how it goes and how many mini cheesecakes it makes.
When heating the initial cookie crust you mention placing the rack on the lower third in the oven.
When baking the whole of the cheesecake is it at the same position or up a little on the center rack?
I plan on making this today, just waiting on the requisite ingredients to come to room temperature and to hopefully get a response on the rack position, if it matters.
I just want it all to come out right because I’m kind of fiending for this, heh. Thank you!
It should be fine leaving the rack on the lower third position but if you want to be extra careful, cooking on the center rack would just help it cook more gently. The lower rack position is best for browning bottoms, like the crust.
I have made this many times. It is wonderful
Being able to make your own perfect cheesecake is a super power.
This came out perfect…came out nice and tall, rich and creamy.
Will be used g this recipe from now on.
Love it when a recipe makes it into the permanent list!